Docker for Web Developers: Images, Containers & Production-Ready Builds
Introduction: Why Docker Changes Everything
Picture this: You build a Django app on your MacBook. It works perfectly. You push the code to GitHub. Your teammate pulls it on their Windows machine — it crashes. You deploy it to an Ubuntu server — it crashes again. Different Python versions. Missing system libraries. Path separators that don't match. It's the classic "works on my machine" nightmare.
Docker solves this by packaging your application with its entire environment into a single, portable unit. Whether it runs on your laptop, a staging server, or a production cluster in Tokyo, it behaves exactly the same way.
Real-World Context: Netflix deploys over 200,000 containers daily. Spotify, Uber, and Shopify all run their core services inside containers. If you're building modern web applications, Docker isn't optional — it's foundational.
The Shipping Container Analogy
Think of a Docker container as a shipping container on a cargo ship.
| Real Shipping Container | Docker Container |
|---|---|
| Packages goods + protects them | Packages app + protects it |
| Same container fits on any ship | Same container runs on any server |
| You don't care what's inside to move it | You don't care what OS is underneath |
| Standardized size (20ft, 40ft) | Standardized format (image layers) |
A Docker image is the blueprint (the empty container specification). A Docker container is the running instance (the actual container loaded with goods, sailing on a ship).
Core Concepts Explained with Code
1. Image vs Container: Recipe vs Cooked Meal
An image is like a recipe — it tells you exactly what ingredients to use and how to prepare them. A container is the cooked meal — the actual running application.
1# Build the IMAGE (recipe) 2docker build -t my-flask-app:1.0 . 3 4# Run the CONTAINER (cooked meal) 5docker run -d -p 8080:5000 --name my-app my-flask-app:1.0
What's happening here?
docker buildreads yourDockerfileand creates an image namedmy-flask-appwith tag1.0docker runspins up a container from that image-druns it in the background (detached mode)-p 8080:5000maps your laptop's port 8080 to the container's port 5000--name my-appgives it a friendly name so you don't have to remember random IDs
2. Dockerfile: The Recipe File
A Dockerfile is a text file with step-by-step instructions. Let's build a production-ready Flask app from scratch.
1# Dockerfile 2# ============================================ 3# Base Image: Official Python 3.12 slim 4# "slim" removes unnecessary packages, keeping the image small 5# ============================================ 6FROM python:3.12-slim 7 8# Set environment variables 9ENV PYTHONDONTWRITEBYTECODE=1 \ 10 PYTHONUNBUFFERED=1 \ 11 PIP_NO_CACHE_DIR=1 \ 12 PIP_DISABLE_PIP_VERSION_CHECK=1 13 14# Set working directory inside the container 15WORKDIR /app 16 17# Install system dependencies (only what's needed) 18RUN apt-get update && apt-get install -y --no-install-recommends \ 19 gcc \ 20 libpq-dev \ 21 && rm -rf /var/lib/apt/lists/* 22 23# Copy requirements FIRST (Docker layer caching optimization) 24COPY requirements.txt . 25 26# Install Python dependencies 27RUN pip install --upgrade pip && \ 28 pip install -r requirements.txt 29 30# Copy the rest of the application 31COPY . . 32 33# Create a non-root user for security 34RUN useradd -m -u 1000 appuser && chown -R appuser:appuser /app 35USER appuser 36 37# Expose the port the app runs on 38EXPOSE 5000 39 40# Health check: Docker will verify the app is actually running 41HEALTHCHECK \ 42 CMD curl -f http://localhost:5000/health || exit 1 43 44# Command to run the application 45CMD ["gunicorn", "--bind", "0.0.0.0:5000", "--workers", "4", "app:app"]
Why this order matters (Layer Caching):
Docker builds images in layers. Each instruction creates a new layer. If a layer hasn't changed, Docker reuses the cached version.
Layer 1: FROM python:3.12-slim          ← Cached (rarely changes)
Layer 2: ENV ...                          ← Cached
Layer 3: RUN apt-get ...                  ← Cached
Layer 4: COPY requirements.txt .           ← Cached if requirements.txt unchanged
Layer 5: RUN pip install ...              ← Cached if requirements.txt unchanged
Layer 6: COPY . .                         ← CHANGES every time you edit code
Layer 7: RUN useradd ...                  ← Cached
Layer 8: USER appuser                     ← Cached
Layer 9: EXPOSE 5000                      ← Cached
Layer 10: HEALTHCHECK ...                 ← Cached
Layer 11: CMD ...                         ← Cached
Production Tip: By copying requirements.txt and running pip install before copying your entire codebase, you ensure that dependency installation is cached. When you change a single line of Python code, Docker skips the pip install step entirely — your builds go from 3 minutes to 10 seconds.
3. Port Mapping: The Doorway
Your container is isolated. It has its own network stack. Port 5000 inside the container is not port 5000 on your laptop.
1# WRONG: This exposes port 5000 INSIDE the container only 2# You can't access it from your browser 3docker run my-flask-app 4 5# RIGHT: Map host port 8080 → container port 5000 6# Now visit http://localhost:8080 in your browser 7docker run -p 8080:5000 my-flask-app 8 9# You can run MULTIPLE instances on different host ports 10docker run -d -p 8080:5000 --name app-1 my-flask-app 11docker run -d -p 8081:5000 --name app-2 my-flask-app 12docker run -d -p 8082:5000 --name app-3 my-flask-app
Real-World Use Case: In production, you might run 4 Gunicorn workers inside one container, and run 3 container instances on ports 8080, 8081, 8082. Nginx then load-balances traffic across all three.
4. Volumes: Persistent Data
Containers are ephemeral — when they die, their filesystem disappears. But your database data, uploaded files, and logs need to survive.
1# Anonymous volume (Docker manages the location) 2docker run -v /app/data my-flask-app 3 4# Named volume (you control it, reusable) 5docker run -v postgres_data:/var/lib/postgresql/data postgres:16 6 7# Bind mount (syncs host folder with container folder) 8# Perfect for development: edit code on host, see changes instantly 9docker run -v $(pwd):/app my-flask-app
Production vs Development:
| Environment | Volume Strategy | Why |
|---|---|---|
| Development | Bind mount (-v $(pwd):/app) | Hot-reload: edit code, see changes instantly |
| Production | Named volume (-v pgdata:/var/lib/postgresql/data) | Data persists across container restarts |
| Production | No bind mounts for code | Immutable infrastructure: deploy new image, don't patch running container |
The .dockerignore File: Your Secret Weapon
Before Docker copies files into your image, it checks .dockerignore. Without it, you're shipping your entire Git history, node_modules, and .env files to production.
1# .dockerignore 2# Git 3.git 4.gitignore 5 6# Python 7__pycache__/ 8*.py[cod] 9*$py.class 10*.so 11.env 12.venv/ 13venv/ 14ENV/ 15 16# Node (if you have a frontend) 17node_modules/ 18npm-debug.log 19.next/ 20 21# IDE 22.idea/ 23.vscode/ 24*.swp 25*.swo 26 27# OS 28.DS_Store 29Thumbs.db 30 31# Testing 32.pytest_cache/ 33.coverage 34htmlcov/ 35 36# Local development 37docker-compose.override.yml 38*.local
Real Impact: A typical Node.js project has node_modules around 500MB-1GB. With .dockerignore, your image drops from 1.2GB to 180MB. That's faster builds, faster deploys, and lower storage costs.
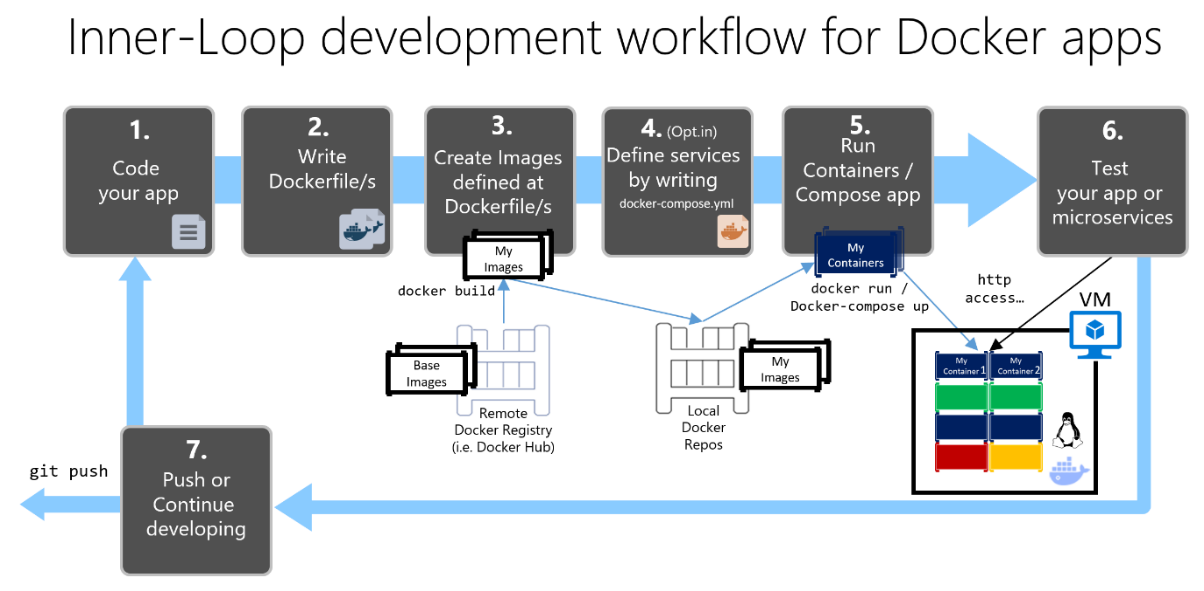
Hands-On Lab: Build Your First Production Container
Step 1: Create the Project
1mkdir docker-flask-lab && cd docker-flask-lab 2 3# Create the Flask app 4cat > app.py << 'EOF' 5from flask import Flask, jsonify 6import os 7 8app = Flask(__name__) 9 10@app.route('/') 11def home(): 12 return jsonify({ 13 "message": "Hello from Docker!", 14 "version": "1.0.0", 15 "environment": os.getenv("ENV", "development") 16 }) 17 18@app.route('/health') 19def health(): 20 return jsonify({"status": "healthy"}), 200 21 22if __name__ == '__main__': 23 app.run(host='0.0.0.0', port=5000) 24EOF 25 26# Create requirements 27cat > requirements.txt << 'EOF' 28flask==3.0.3 29gunicorn==23.0.0 30EOF
Step 2: Write the Dockerfile
Use the production-ready Dockerfile from earlier. Save it as Dockerfile in the same directory.
Step 3: Build and Run
1# Build the image 2docker build -t my-flask-app:1.0 . 3 4# See your image 5docker images | grep my-flask-app 6# Output: my-flask-app 1.0 abc123def456 2 minutes ago 187MB 7 8# Run the container 9docker run -d \ 10 --name flask-prod \ 11 -p 8080:5000 \ 12 -e ENV=production \ 13 my-flask-app:1.0 14 15# Check it's running 16docker ps 17# Output: flask-prod Up 30 seconds 0.0.0.0:8080->5000/tcp 18 19# Test the endpoints 20curl http://localhost:8080/ 21# {"message": "Hello from Docker!", "version": "1.0.0", "environment": "production"} 22 23curl http://localhost:8080/health 24# {"status": "healthy"} 25 26# Check logs 27docker logs flask-prod 28 29# Check health status 30docker inspect --format='{{.State.Health.Status}}' flask-prod 31# Output: healthy
Step 4: Verify Security
1# Check the user inside the container (should NOT be root) 2docker exec flask-prod whoami 3# Output: appuser 4 5# Check the user ID 6docker exec flask-prod id 7# Output: uid=1000(appuser) gid=1000(appuser) groups=1000(appuser)
Step 5: Clean Up
1# Stop and remove the container 2docker stop flask-prod && docker rm flask-prod 3 4# Remove the image 5docker rmi my-flask-app:1.0
Common Mistakes & How to Fix Them
❌ Mistake 1: Using the latest Tag
1# WRONG: "latest" changes over time. Your build is not reproducible. 2FROM python:latest 3FROM node:latest 4FROM nginx:latest
Why It's Wrong: The latest tag points to whatever was most recently pushed. Today it might be Python 3.12, tomorrow Python 3.13. Your production build could break because the underlying image changed.
The Fix:
1# RIGHT: Pin to a specific version. Your build is identical every time. 2FROM python:3.12.4-slim 3FROM node:20.11.0-alpine 4FROM nginx:1.25.3-alpine
Production Impact: At a previous company, we had a production outage because node:latest silently upgraded from Node 18 to Node 20, breaking a native dependency. Pinning versions would have prevented 3 hours of downtime.
❌ Mistake 2: Running as Root
1# WRONG: The container runs as root (UID 0) 2# If an attacker breaks in, they have root access to the container 3# AND potentially the host system 4FROM python:3.12-slim 5COPY . /app 6WORKDIR /app 7CMD ["python", "app.py"]
Why It's Wrong: A container running as root that escapes its isolation can compromise the entire host server. This is how many container breakouts happen.
The Fix:
1# RIGHT: Create and switch to a non-root user 2FROM python:3.12-slim 3 4# Create a dedicated user 5RUN groupadd -r appgroup && useradd -r -g appgroup appuser 6 7WORKDIR /app 8COPY . . 9 10# Switch to non-root user 11USER appuser 12 13CMD ["python", "app.py"]
Verify:
1docker exec my-container id 2# uid=999(appuser) gid=999(appgroup) ← Good!
❌ Mistake 3: No .dockerignore
Without .dockerignore, Docker copies everything into your image — including .git (can be 100MB+), node_modules, .env files with secrets, and test artifacts.
The Fix: Use the .dockerignore template provided earlier. Run this to see what you're shipping:
1# See what Docker would copy into your image 2docker build -t test-image . --no-cache 2>&1 | head -20
❌ Mistake 4: Installing Dev Dependencies in Production
1# WRONG: pytest, coverage, and debug tools end up in production 2COPY requirements.txt . 3RUN pip install -r requirements.txt 4# requirements.txt contains: flask, gunicorn, pytest, coverage, black, pylint
Why It's Wrong: Dev tools increase image size and attack surface. pytest has had vulnerabilities. You don't need a code formatter in production.
The Fix: Use separate requirement files:
1# requirements.txt (production only) 2flask==3.0.3 3gunicorn==23.0.0 4psycopg2-binary==2.9.9 5redis==5.0.0
1# requirements-dev.txt (development extras) 2-r requirements.txt 3pytest==8.0.0 4pytest-cov==4.1.0 5black==24.0.0 6pylint==3.0.0
1# Dockerfile uses only production dependencies 2COPY requirements.txt . 3RUN pip install -r requirements.txt
❌ Mistake 5: No Health Checks
Without a health check, Docker thinks your container is "running" even if your app is stuck in a deadlock or has run out of database connections.
The Fix:
1HEALTHCHECK \ 2 CMD curl -f http://localhost:5000/health || exit 1
What this does:
- Every 30 seconds, Docker makes an HTTP request to
/health - If it fails 3 times in a row, Docker marks the container as
unhealthy - Orchestrators (Docker Swarm, Kubernetes) can automatically restart unhealthy containers
Best Practices Checklist
Before you push any image to production, verify:
- Version pinned:
FROM python:3.12.4-slimnotFROM python:latest - Non-root user:
USER appuserwith UID ≥ 1000 -
.dockerignorepresent: No secrets, git history, or dev files - Layer caching optimized:
COPY requirements.txtbeforeCOPY . - Health check defined: Application-level health endpoint
- Minimal base image: Alpine or slim variants preferred
- No dev dependencies: Separate
requirements.txtandrequirements-dev.txt - Single process per container: One app, one container (with exceptions)
- Environment variables for config: No hardcoded secrets
- Logs to stdout/stderr: Don't write to files inside the container
Mini Project: Containerize a Real Flask API
Build a Task Manager API with the following specs:
Requirements
-
Endpoints:
GET /tasks— List all tasksPOST /tasks— Create a task ({"title": "string", "done": false})GET /tasks/<id>— Get a specific taskDELETE /tasks/<id>— Delete a taskGET /health— Health check
-
Production Requirements:
- Use Gunicorn with 4 workers
- Run as non-root user (
appuser) - Pin all dependency versions
- Include a
.dockerignore - Image size under 200MB
- Health check configured
- Environment variable for
ENV(development/staging/production)
-
Verify It Works:
1docker build -t task-manager:1.0 . 2docker run -d -p 8080:5000 --name task-api task-manager:1.0 3 4# Create a task 5curl -X POST http://localhost:8080/tasks \ 6 -H "Content-Type: application/json" \ 7 -d '{"title": "Learn Docker", "done": false}' 8 9# List tasks 10curl http://localhost:8080/tasks 11 12# Check health 13docker inspect --format='{{.State.Health.Status}}' task-api 14# Should output: healthy
Starter Code
1# app.py 2from flask import Flask, request, jsonify 3import os 4import uuid 5 6app = Flask(__name__) 7 8# In-memory storage (use a real DB in production!) 9tasks = {} 10 11@app.route('/health') 12def health(): 13 return jsonify({"status": "healthy", "env": os.getenv("ENV", "development")}), 200 14 15@app.route('/tasks', methods=['GET']) 16def list_tasks(): 17 return jsonify(list(tasks.values())), 200 18 19@app.route('/tasks', methods=['POST']) 20def create_task(): 21 data = request.get_json() 22 if not data or 'title' not in data: 23 return jsonify({"error": "Title is required"}), 400 24 25 task = { 26 "id": str(uuid.uuid4()), 27 "title": data['title'], 28 "done": data.get('done', False) 29 } 30 tasks[task['id']] = task 31 return jsonify(task), 201 32 33@app.route('/tasks/<task_id>', methods=['GET']) 34def get_task(task_id): 35 task = tasks.get(task_id) 36 if not task: 37 return jsonify({"error": "Task not found"}), 404 38 return jsonify(task), 200 39 40@app.route('/tasks/<task_id>', methods=['DELETE']) 41def delete_task(task_id): 42 if task_id not in tasks: 43 return jsonify({"error": "Task not found"}), 404 44 del tasks[task_id] 45 return jsonify({"message": "Task deleted"}), 200 46 47if __name__ == '__main__': 48 app.run(host='0.0.0.0', port=5000)
1# requirements.txt 2flask==3.0.3 3gunicorn==23.0.0
Solution Dockerfile
Click to reveal solution
1FROM python:3.12.4-slim 2 3ENV PYTHONDONTWRITEBYTECODE=1 \ 4 PYTHONUNBUFFERED=1 \ 5 ENV=production 6 7WORKDIR /app 8 9COPY requirements.txt . 10RUN pip install --no-cache-dir -r requirements.txt 11 12COPY . . 13 14RUN useradd -m -u 1000 appuser && chown -R appuser:appuser /app 15USER appuser 16 17EXPOSE 5000 18 19HEALTHCHECK \ 20 CMD python -c "import urllib.request; urllib.request.urlopen('http://localhost:5000/health')" || exit 1 21 22CMD ["gunicorn", "--bind", "0.0.0.0:5000", "--workers", "4", "--access-logfile", "-", "--error-logfile", "-", "app:app"]
What You've Learned
| Concept | What It Is | Why It Matters |
|---|---|---|
| Image | Blueprint/read-only template | Reproducible builds across environments |
| Container | Running instance of an image | Isolated, portable execution environment |
| Dockerfile | Build instructions | Defines exactly how your app is packaged |
| Layer Caching | Reuses unchanged build steps | 10-second builds instead of 3-minute builds |
| Port Mapping | -p 8080:5000 | Connects container to the outside world |
| Volumes | Persistent/shared storage | Data survives container restarts |
| Non-Root User | USER appuser | Prevents container breakouts |
| Health Checks | HEALTHCHECK instruction | Enables auto-recovery in production |
.dockerignore | Excludes files from build | Smaller images, no leaked secrets |
Next Steps
In Module 2, you'll learn Docker Compose — the tool that lets you run your Flask API, PostgreSQL database, and Redis cache together with a single command:
1docker compose up -d
No more running docker run five times. No more manual network configuration. One file, one command, entire stack running.
Additional Resources
- Dockerfile Reference: docs.docker.com/engine/reference/builder
- Docker Best Practices: docs.docker.com/develop/dev-best-practices
- Dive (image inspector):
docker run --rm -it wagoodman/dive:latest my-flask-app— See exactly what's inside your image and where the bloat is - Hadolint (Dockerfile linter): Catches mistakes before you build
Did you complete the mini project? Share your image size and build time in the comments. In the next module, we'll connect this container to a real database and add a frontend — all orchestrated with Docker Compose.