Module 1: Django Setup & Project Architecture — Complete Tutorial
🎯 What You Will Learn in This Module
By the end of this tutorial, you will:
- Understand why Django uses projects and apps separately
- Set up a professional development environment
- Create your first Django project and multiple apps
- Grasp the MTV (Model-Template-View) architecture that powers every Django application
- Have a working project structure ready for Modules 2–15
📖 1. Why Django? A Quick Overview
Django is a high-level Python web framework that encourages rapid development and clean, pragmatic design. Built by experienced developers, it handles much of the hassle of web development, so you can focus on writing your app without needing to reinvent the wheel.
Key Philosophy: "Django follows the DRY principle — Don't Repeat Yourself."
🛠️ 2. Setting Up Your Development Environment
Before writing any Django code, you need an isolated environment. Think of a virtual environment as a separate container for your project — it keeps dependencies organized and prevents version conflicts between different projects.
Step 1: Create a Virtual Environment
Open your terminal (Command Prompt, PowerShell, or Terminal) and navigate to the folder where you want to create your project:
1# Navigate to your projects folder 2cd Desktop 3mkdir django-course 4cd django-course 5 6# Create the virtual environment 7python -m venv venv
What just happened?
The python -m venv venv command created a new folder named venv containing a fresh Python installation. This is your isolated workspace.
Step 2: Activate the Virtual Environment
You must activate this environment every time you work on your project.
On macOS/Linux:
1source venv/bin/activate
On Windows (Command Prompt):
1venv\Scripts\activate
On Windows (PowerShell):
1venv\Scripts\Activate.ps1
💡 Tip: When activated, your terminal will show
(venv)at the beginning of the line. This confirms you're working inside the virtual environment.
To deactivate (when you're done working):
1deactivate
📦 3. Installing Django & Django REST Framework
With your environment active, install the required packages:
1pip install django djangorestframework
What are you installing?
| Package | Purpose |
|---|---|
django | The core web framework |
djangorestframework | Toolkit for building Web APIs (used in later modules) |
Verify the installation:
1django-admin --version
You should see a version number like 5.1.x or 4.2.x. This confirms Django is ready.
📝 Best Practice: Always pin your dependencies. After installing, run:
1pip freeze > requirements.txtThis creates a
requirements.txtfile so anyone (or you, on another machine) can recreate the exact same environment usingpip install -r requirements.txt.
🏗️ 4. Creating Your First Django Project
A Django project is the entire web application — the container that holds everything together. It includes configuration, URL routing, and WSGI/ASGI entry points.
Run this command inside your django-course folder (with venv activated):
1django-admin startproject myproject .
The dot (.) at the end is important! It tells Django to create the project in the current directory instead of creating an extra nested folder.
What Django Created for You
After running the command, your folder structure looks like this:
django-course/
├── venv/                   # Virtual environment (don't touch)
├── manage.py               # Django's command-line utility
└── myproject/              # Project configuration package
    ├── __init__.py         # Tells Python this is a package
    ├── settings.py         # All project settings & configurations
    ├── urls.py             # Root URL routing table
    ├── asgi.py             # ASGI config for async servers
    └── wsgi.py             # WSGI config for traditional servers
File-by-File Breakdown:
| File | What It Does |
|---|---|
manage.py | Your command center. Use it to run the server, create database tables, manage users, and more. |
__init__.py | Empty file that makes myproject a Python package. |
settings.py | The brain of your project. Database connections, installed apps, middleware, static files — everything lives here. |
urls.py | The traffic controller. It maps incoming web addresses (URLs) to the correct views. |
wsgi.py | Entry point for WSGI-compatible web servers (like Gunicorn) in production. |
asgi.py | Entry point for ASGI-compatible servers, enabling WebSockets and async features. |
🧱 5. Understanding Projects vs. Apps
This is where many beginners get confused. Let's clear it up.
What is a Project?
A project is your entire website. It's the configuration wrapper. You typically have one project per website.
What is an App?
An app is a specific feature or module of your website. A project is made up of one or more apps. Each app handles one piece of functionality.
Real-World Analogy:
Imagine building a university. The university campus is your project. Within it, you have separate buildings — a Library, a Cafeteria, a Science Lab, a Dormitory. Each building is an app. They are independent but work together under the university (project).
Creating Your Apps
Let's create three apps for our blog platform:
1python manage.py startapp users 2python manage.py startapp blog 3python manage.py startapp api
What each app will handle:
| App | Responsibility |
|---|---|
users | User registration, login, profiles, and authentication |
blog | Blog posts, categories, comments, and content management |
api | REST API endpoints for mobile apps or frontend frameworks |
App Folder Structure
Each app Django creates follows this pattern:
appname/
├── migrations/           # Database migration files (auto-generated)
│   └── __init__.py
├── __init__.py           # Makes it a Python package
├── admin.py              # Django admin panel configuration
├── apps.py               # App configuration class
├── models.py             # Database table definitions (Module 3)
├── tests.py              # Unit tests for this app (Module 14)
└── views.py              # Request/response logic (Module 7)
⚙️ 6. Registering Apps in settings.py
Django doesn't automatically know about your apps. You must register them.
Open myproject/settings.py and find the INSTALLED_APPS list. Add your apps and rest_framework:
1INSTALLED_APPS = [ 2 # Django built-in apps 3 'django.contrib.admin', 4 'django.contrib.auth', 5 'django.contrib.contenttypes', 6 'django.contrib.sessions', 7 'django.contrib.messages', 8 'django.contrib.staticfiles', 9 10 # Third-party packages 11 'rest_framework', 12 13 # Your local apps 14 'users', 15 'blog', 16 'api', 17]
Why this matters:
If you don't register an app here, Django will ignore its models.py, admin.py, and templates. The app simply won't function as part of your project.
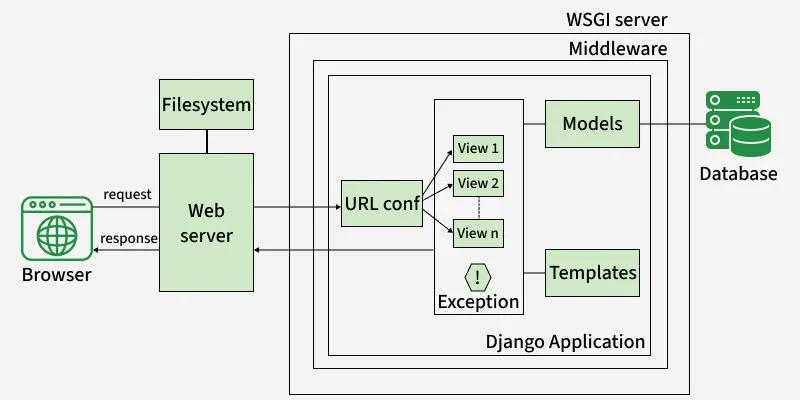
🏛️ 7. Understanding MTV Architecture
Django follows the MTV (Model-Template-View) architecture pattern. If you've heard of MVC (Model-View-Controller), MTV is Django's version of the same idea.
The Three Layers
┌─────────────────────────────────────────────────────────────┐
│                         BROWSER                             │
└──────────────────────┬──────────────────────────────────────┘
                       │ HTTP Request
                       ▼
┌─────────────────────────────────────────────────────────────┐
│  URL DISPATCHER  →  Finds the right VIEW based on the URL   │
└──────────────────────┬──────────────────────────────────────┘
                       │
         ┌─────────────┼─────────────┐
         ▼             ▼             ▼
    ┌─────────┐  ┌─────────┐  ┌─────────┐
    │  MODEL  │  │  VIEW   │  │ TEMPLATE│
    │  (Data) │  │(Logic)  │  │(HTML)   │
    └────┬────┘  └────┬────┘  └────┬────┘
         │            │            │
         │ Talks to   │ Decides    │ Renders
         │ Database   │ what to do │ the final
         │            │            │ HTML page
         └────────────┴────────────┘
                       │
                       ▼ HTTP Response
┌─────────────────────────────────────────────────────────────┐
│                         BROWSER                             │
└─────────────────────────────────────────────────────────────┘
Model
- Defines the data structure
- Represents database tables as Python classes
- Handles all database operations (create, read, update, delete)
- File:
models.py
Template
- Handles the presentation layer
- Contains HTML with special Django template syntax
- Displays data passed by the View
- File:
templates/folder
View
- Contains the business logic
- Receives HTTP requests, processes them, interacts with Models
- Returns an HTTP response (usually by rendering a Template)
- File:
views.py
How they work together:
- User visits a URL (
/blog/post-1/) - URL Dispatcher routes to the correct View
- View asks Model for data (e.g., "get post with slug 'post-1'")
- Model fetches data from the database
- View passes data to a Template
- Template renders the final HTML
- View sends the HTML back to the user's browser
🚀 8. Running Your Project for the First Time
Let's verify everything is working. Run:
1python manage.py runserver
You should see output like:
Watching for file changes with StatReloader
Performing system checks...

System check identified no issues.

Starting development server at http://127.0.0.1:8000/
Quit the server with CONTROL-C.
Open your browser and visit: http://127.0.0.1:8000/
You should see the Django welcome page with a rocket illustration and the message: "The install worked successfully! Congratulations!"
🎉 Congratulations! Your Django project is alive.
To stop the server: Press CTRL + C in your terminal.
🧪 9. Practice Task — Build Your Foundation
Now it's your turn. Complete these steps to solidify what you learned:
Task Checklist
- 1. Create a new folder named
my-first-django - 2. Create and activate a virtual environment inside it
- 3. Install Django and Django REST Framework
- 4. Create a project named
myproject(remember the dot!) - 5. Create three apps:
users,blog, andapi - 6. Register all apps (including
rest_framework) insettings.py - 7. Run
python manage.py runserverand confirm the welcome page loads - 8. Run
python manage.py check— you should seeSystem check identified no issues (0 silenced).
Expected Final Structure
my-first-django/
├── venv/
├── manage.py
├── myproject/
│   ├── __init__.py
│   ├── settings.py      ← Apps registered here
│   ├── urls.py
│   ├── asgi.py
│   └── wsgi.py
├── users/
│   ├── migrations/
│   ├── __init__.py
│   ├── admin.py
│   ├── apps.py
│   ├── models.py
│   ├── tests.py
│   └── views.py
├── blog/
│   └── (same structure)
├── api/
│   └── (same structure)
└── requirements.txt
❌ Common Mistakes & How to Fix Them
| Mistake | Error Message | Solution |
|---|---|---|
Forgot to activate venv | pip: command not found or installs globally | Run source venv/bin/activate (Mac/Linux) or venv\Scripts\activate (Windows) |
Forgot the dot in startproject | Extra nested myproject folder | Delete and rerun: django-admin startproject myproject . |
| App not registered | AppConfig errors or models not found | Add app name to INSTALLED_APPS in settings.py |
| Port already in use | Error: That port is already in use | Run: python manage.py runserver 8001 (use different port) |
| Python not found | 'python' is not recognized | Use py instead of python on Windows, or check your PATH |
✅ Module 1 Summary
| Concept | Key Takeaway |
|---|---|
| Virtual Environment | Isolates project dependencies. Always activate before working. |
| Project | The main container. One project = one website. |
| App | A feature module. Reusable across projects. |
manage.py | Your command-line tool for everything Django. |
settings.py | Central configuration. Register all apps here. |
| MTV | Model = Data, Template = HTML, View = Logic. |
runserver | Local development server. Not for production. |
🚪 What's Next?
In Module 2, we will dive deep into settings.py — the configuration engine of your Django project. You'll learn to configure databases, authentication backends, static files, middleware, and security settings for both development and production environments.
Before proceeding, make sure:
- Your virtual environment is active
- Your project runs without errors
- All three apps are registered
- You understand the difference between a Project and an App
Ready for Module 2? Your Django journey has officially begun! 🐍🚀